Monday, April 30, 2018

Just Dance...under the sea

Good morning Tutti friends!

Vicki here...I'm changing up the typical card project and replacing it with a scrapbook layout using four of the dies from Tutti Designs April release.  If you haven't seen the newly released nautical dies, stop by the Tutti Designs Store and add a few to your stash today!
 
"Just Dance"
 
I've used Coral, Coral Reef Corner, Fishing Net, and Under the Sea to embellish this 12 x 12 layout.  These die cuts were perfect for our granddaughter's recital photo.  And, the dance theme was "under the sea"! 
 
 
The Coral Reef Corner was cut twice, one from turquoise/green glitter cardstock, and the matting from coral cardstock. 
 
 
The Fishing Net is cut from cork for texture and the Coral has added dimension using foam tape.  I cut the crab from the Under the Sea die. 
 
Featured Product


 Thank you for stopping by to share my Just Dance inspiration for Tutti Designs!
 
Be sure to visit the Tutti Designs Store  for all available die cuts in the most recent release along with the full inventory of Tutti Dies.

You'll find more inspiration on our other Tutti Designs sites:


Saturday, April 28, 2018

Confirmation frames

Hi there Tutti Fans!


Today I decided to make some frames for a card using 


I started with the large to create the square, then cut with the next die to create a frame.
I did this a few times.

I then cut one of the large frames into 4 pieces

and used them to create the illusion of a larger frame,
simply glue in place to cover the cuts.

I glued these to my card base

then continued to layer more frames and one centre piece
using dimensionals. The centre will hold my photo.

To create a frame for my wording I used one of the left over squares
and placed the die as above to get a bottom line of crosses.
I used top and bottom of this square to get two frames.

I added some little punched crosses, pearls and wording.
Sorry to block the centre but I don't like sharing kids photos online.

For my card I used


For your convenience, here are all the Tutti Designs quick links you will need:


 Thanks for dropping by today!

Friday, April 27, 2018

The Flower Family


Hi everyone, Laurie here with a fun spring card using Tutti's Flower Family die. 

TUTTI-436 Flower Family

These are such sweet flowers!

 Tutti has 7 of them, each with a different word stem and flower top. I cut mine out with some alcohol ink papers I had made. First I cut it out in the green, then just the flower top in pink. I adhered that onto the green.


Then I adhered  the completed flower onto a Tutti scalloped stitched rectangle. For my middle panel, I used a stencil and a Claritystamp brush. I brushed on some pink ink very lightly, for a soft look.


Then I adhered it altogether!


Here are some Tutti Designs quick links:


Thanks for stopping by, see you next Friday!

Laurie

Thursday, April 26, 2018

To The Beach! Folio

Hello! Jenn here today, sharing with you this fun folio I created using the newly released dies from Tutti Designs along with the Seafarer paper collection from Authentique!

For my fun beach folio, I have used three of the 11 newly released beach themed dies from Tutti

I used dies from the Tutti 414 - Dotted Nesting Rectangles set as well
I also used
Distress Ink Fired Brick and Stormy Sky
Distress Pain Picket Fence
Adhesive tape runner
Glue stick
Foam adhesive
Jute
Ribbon
Flowers
Navy cardstock
Medium weight chipboard
All of the designer papers, cutouts, and sticker elements are from Authentique's Seafarer Collection


This folio card started as a base in which I used a tutorial by Kathy Wright Clement. Kathy has some great tutorials for fun folds and folios on her YouTube channel HERE.
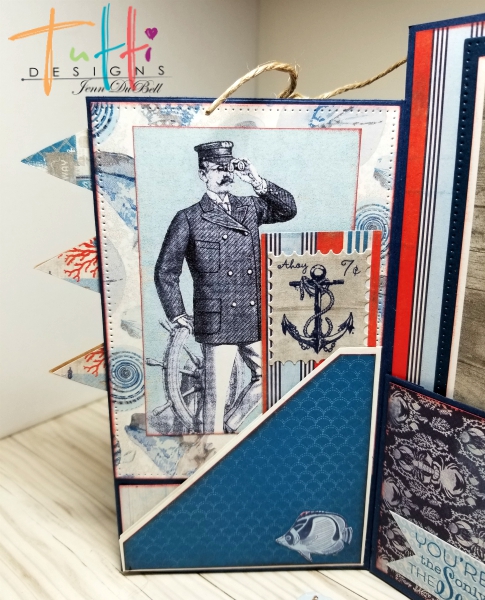
Once my base was built, I added lots of fun embellishments, cut-outs, sentiments, and journaling cards. I added many elements on the pages to allow for pictures to easily be added as well. Please enjoy the following picture by picture walkthrough of this fun folio!
I absolutely love the new mermaid die! She easily can be added anywhere like a paperclip!

For the new ship in a bottle die, I adhered it to a patterned paper for a standout effect and then fussy cut, punched a hole, added jute and an anchor charm to create this super fun tag insert!
I used the dotted nesting rectangle dies to create the matting for some of the pages. I love how they add a touch of texture with the dots!
I used chipboard to create tabs in the folds of these pages. They also spell out Under the Sea when the folio is closed. I just love all the fun elements you can add to a folio!
For another tag element here I used the seashell corner die and adhered only the outer edge to the paper to allow for a picture to be slipped in. There's that adorable mermaid peeking out again! As you can see by using the inner part of her face she can be clipped on anywhere!
The mattes in the background were cut with the Dotted nesting rectangles dies. This was also done to create the journaling card.


Once you build a base for a fun fold card or folio such as this, there are endless possibilities to what you can create!
Thanks so much for viewing my post today!
For your convenience, here are all the Tutti Designs quick links you will need:


Until next time! Happy crafting!!
Jenn


Wednesday, April 25, 2018

Sending Warm Fuzzies


 Thank you and welcome back I am here to share my card with you.  
Using the wonderful Tutti Designs Dies.


I cut out the Lily Heart Panel out of black cardstock


I snipped out the heart from the die panel


As well as the fun Lily Heart Panel die, I stamped on pattern paper and colored these Moose, and Sending Warm Fuzzies, Happy Anniversary, using Memento InkCopic Markers, and white Gel PenLiquid Glue, Foam tape.


Thanks again for stopping and for these dies and more wonderful inspirations stop by the store, blog and for all the links, see below.  
Until next time Happy Crafting!


Tuesday, April 24, 2018

Lily Of The Valley Frame

Hi, Diane With with you today using a beautiful
Tutti Designs Lily of the Valley die.

The first card I die cut in white
then colored in with Copics on the leaves only.
An embossed background panel that I added an oval
foam piece to the center so it wouldn't emboss and left me
a flat place to add my sentiment.
A tiny butterfly was added to finish.


The second card is using the same Lily of the Valley die
also die cut in white but this time not only coloring the leaves,
but adding Cloud Nine glitter to the flowers.
The back panel was also embossed, but I added a designer paper
to fill in the oval, a tiny picket fence behind
and two 'flying' doves.
The sentiment was stamped directly on the oval.


No automatic alt text available.

And here are some Tutti Designs quick links:


Thank you for visiting with me today.

Monday, April 23, 2018

Under the Sea...

Good morning Tutti friends!

Vicki here with you today.  I am so excited to share "Under the Sea"  from the  April 2018 release.  The eleven nautical themed dies in this release are now available for purchase in the Tutti Designs Store.  They are amazing and a must have for your die cut collection!

When I hear, "Under the Sea", I can't help but think of the Little Mermaid, Sebastian the crab and all of the fun characters from Disney's Little Mermaid movie.  It's one of my all time favorites and the reason the new Under the Sea die is now a favorite too! 

I decided to create a whimsical card using this new die.  One that gives a magical, fantasy feeling of life below the ocean surface...

Here's my inspiration using the new Under the Sea, and the Believe Word Set.
 
"Believe"

Wow, this Under the Sea die cut is so elegant cut from gold metallic cardstock.  I wanted to show off all  the details without using a lot of embellishing.  The card base is an older embossed cardstock that I've had in my stash for years.  It's layered with water color patterned paper that has a tiny gold fleck design.  I matted this with a fine edge of white cardstock.  The minimal embellishing includes blue dew drops for water bubbles and a sparkly, gold starfish.
 
 
The sentiment, Believe, is also cut from the gold metallic and matted with the same cardstock as the base.  It fit perfectly in the frame created by the Under the Sea die.


Dew drops are always a fun embellishment to use as water droplets.

Featured Product

Tutti Designs Believe Word Set


Tutti Designs Under the Sea


 Thank you for stopping by to share my  "Under the Sea"  inspiration for Tutti Designs!
 
Be sure to visit the Tutti Designs Store for all available die cuts in the most recent release along with the full inventory of Tutti Dies.

You'll find more inspiration on our other Tutti Designs sites:


Saturday, April 21, 2018

Confirmation card

Hi there Tutti Fans!


Today I am sharing a Confirmation card using this beautiful die


I cut the die out twice, once in white and once in pink
and cut away the crosses from the pink die cut and adhered them on top of the white ones.


Next I added glue on back of white die cut and placed it onto vellum,
which I then trimed away.


I wanted to add some yellow behind the vellum so repeated the glue on back
and trimmed away the yellow access.


This I then popped with 3 dimensional foam ready to be added to my base card.


I used pink card layered up with two different embossed white cards
and added some matching pink ribbon to cover join.


Next I decorated the Holy Cross die with pearls and ribbon
and stuck to centre of card. I punched some tiny doves for the corners.
I will add congratulations and recipients name when I know who it is for.


For my project today I used


Here are all the Tutti Designs links for your convenience.